Showing posts with label DIY Food. Show all posts

Wednesday, November 19, 2014

Little Man 1st Birthday - Mustache and Bow Ties

Looks like I'm on the blogging end of the parties this fall and into winter.  Casie has some great parties going on, and I'm glad to be  able to help her and then share them with all of our readers.  

Her littlest guy turned 1, and she planned a fun party for him along with a cute photo shoot before his birthday.  This guy sure steals everyone's hearts and is the cutest thing ever.  He made this Little Man CeLeBration look completely perfect for all who attended.  
Laura Kidd Photography did such a great job capturing this Little Man's every day expressions.  

 And a new expression of not wanting to have messy hands.

Let the party begin!  Casie went with a Little Man theme, complete with mustaches and bow ties.  

 She used the banner from the Celebration that I gave her after Yahkiyn was born.  I love that she uses it for his monthly photo shoot and now for his first birthday.  She's putting it to good use!

All of the foods had the best names on the labels and was perfect for this theme.  She is such a clever party planner.


 Another delicious cake by Layers of Flavor.


What a fun 1st birthday idea for the cutest little guy around.  The colors, patterns, props, and food names made this small detail party, really fun.  Sometimes all it takes is a few clever ideas to make your party something that everyone will enjoy.  It doesn't have to be real elaborate.  The love is in the people who attend.  Anything else on top of that is just a bonus to the guests.  :)

Happy  Birthday, Yahkiyn!

Monday, February 6, 2012

Zoo Party Ideas

Christi attended a Zoo Party that her mother put on for all of her family.  Here are just some of the ideas that you can incorporate into a zoo party that adds fun and makes special memories.

 Owl party favor bags that the children made during the party.  Using construction paper, cut out the shapes for the owl parts.  It made it easier for the younger ones to put together.  And make sure you have plenty of goodies for them to put into it.

 If you have a program like Indiana does, you might want to take advantage of it.  Indiana Wildlife came with animals to the house to do a program.  Now this can be an expensive addition to a party, but be on the look out at Groupon or other group savings websites for special savings on these kinds of programs. 

 With our group being smaller the children were all able to touch and be right up close to every animal.  And the program teacher had more fun things for the children to put in their owl bags. 

 These were yummy roll ups in the shape of an alligator.  Made it fun for everyone to eat!

 If you aren't much of an artistic cupcake decorator, then you can buy a package of plastic animals at the dollar store for a dollar, add some green sprinkles or use green frosting like grass and tada, you have a fun little cupcake for a fraction of a bakeries cost.    And the children loved picking out which animal they wanted to put into their owl bag to take home.

 The cups that the tiger mac is in can be found at any craft store such as Hobby Lobby or Michaels.  We found that they were the perfect size for children sized portions.  We added the colored paper and ribbon to match the macaroni color and to make them more tiger looking.  Just adds a bit of color and fun.

 Homemade felt finger puppets.  Sorry I don't have a pattern to direct you to, but Christi's mom made these from scratch and from the pattern in her head.  Be creative!  Even if you don't have a specific pattern, try something fun.  Look at pictures of animals and you just might get ideas of how to make them look real and fun to play with.

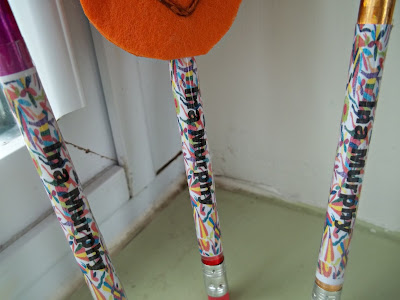
She also wanted to give the children pencils with their names on them.  She found that special ordering just a few of each child's name would be quite expensive, so she bought some clear plastic labels and made them herself on her computer.  I think she may have used white labels for these and printed animals and birds in the background.  They are a little hard to see, but it did add some color and the children loved having their very own pencils. 

There are many things you can do for less money to add fun to a party.  Just think outside of the typical party decor and craft kits box to find what will work for cents instead of dollars.  Simply putting food in an animal shape doesn't cost any more money, but sure does add the animal fun to it!  Other things that she had to add to their party favor bags were printed worksheets of animals (mazes, crossword puzzles, coloring pages), rows of stickers (if you buy a pack of stickers with rows on each sheet, you can easily cut them into strips and give each child a strip instead of a whole sheet), and styrofoam animal stickers (another dollar store purchase.  Find those things that are a dollar but can be divided amongst all the guests), along with their crafts that they made, cupcake topper and little gift from the Wildlife guy.  Be on the lookout at the end of summer for fun things on summer clearance.  Some dollar stores will have sun visors that are animal shaped.  I've seen them for 10-15 cents a piece.  Those would make fun party favors too.  Just keep your eyes peeled and think about when things that you are interested in will go on clearance.  It will make your CeLeBration more of a celebration of saving cents on an amazing party that everyone will remember. 

Tuesday, July 5, 2011

Food Facts and Figures

While figuring out how much food we needed to feed our guests, we most often end up with more food than we need. Ask our husbands. : ) So, this time around, while we were cutting up veggies, a friend (thanks, Celia) suggested we keep track of how much we need, so we can buy the right amounts for each party. Here is what we came up with for the veggies that were purchased. You can see in the picture above how we cut them and used them in the Lavender Celebration. Oh, each number is for an average sized vegetable.

Pepper- 20 slices
Carrot- 6 sticks
Cucumber- 22 slices
Pint of Grape Tomatoes- approx. 45
Brocolli- A LOT of floretts
Cauliflower- A LOT more than brocolli floretts

We generally have 36 ladies at our Celebrations. We bought waaaayyyy too much, but you can be sure next time around, we'll be able to easily figure how much we need. Thanks again, Celia for this great tip on buying veggies.

Wednesday, June 22, 2011

Smores on a Stick


Here's a fun easy addition to any day... any celebration!


You can make these in their original form or add sprinkles to go with your color scheme! Just think...Pink for a girl..Blue for a boy....Red white and Blue for 4th of July... you name it, you can create it!


Keep reading for your simple and detailed instructions. Don't be afraid to get creative!


Here's what we used....

~Graham Crackers
~Chocolate Chips (or Melting chocolate) (we just used one bag)
~Marshmallows (we use Kosher Marshmallows)
~Lollipop sticks (we used kabob skewers cut in half, because it was all we had)

*Your choice of sprinkles, heath toffee bits, colored chocolate to drizzle for a different color effect, crumbled oreos, anything to jazz them up a bit!


Crush your graham crackers into fine crumbs


Melt your chocolate


Dip your marshmallow in the chocolate


Roll in Graham cracker crumbs (or your choice of coating)


Let sit, to let chocolate harden. (You can use this egg carton method, styrofoam, or simply lay them on a plate.)


** TIP**


ALWAYS have a cute little taste tester on hand!!


ENJOY!!!

Monday, March 7, 2011

DIY: "Button" Gingersnap Cookies

I get so many requests for these cookies and the recipe. We thought they would fit nicely at the "Cute as a Button" Celebration we did and had to change them a bit to make them look like buttons. You will find the recipe at the end of this post.


First stir up your dough (it will feel very oily, but that is normal), then roll into balls and place on your cookie sheet. For a regular size cookie put 12 to a sheet, but if you want them to be smaller, more like a button size, roll a ball that will fit into a lid of a water bottle. You should be able to fit several cookies on a sheet making them smaller.

If you pull them out not quite baked all the way, they will finish baking on the sheet and will be nice and chewy, otherwise they will be a little more crisp on the edges.


Using a straw, twist holes into the cookies. Do this while they are still warm or hot. It makes the hole punching much easier. Actually, when they cool off, you pretty much can't get the straw into the cookie. So, make sure you work quickly. : ) You may need to cut the end of your straw every now and then to keep it smaller and to keep a rounder hole. The hot pan will melt it and deform it as you are making the holes.


While the cookies are cooling, melt some white chocolate in a double boiler. When it is smooth you can add coloring. For this batch I tinted it a slight pink. Drop a small amount of melted chocolate on parchment paper, then take a cookie and carefully push the cookie down onto the chocolate, allowing the chocolate to squoosh up through the holes and out around the edges.

Look how cute those cookies are! And they are delicious too!

Now stir up a batch for yourself and let us know what you think!


Dipped Gingersnap Cookies


2 cups sugar

1 1/2 cups oil (you pick what kind you want to use)

2 eggs

4 cups flour (I actually do half all purpose and half whole wheat)

4 tsp. baking soda

2 tsp. cinnamon

1 tsp. salt

1 Tbl. ginger

1/2 cup molasses


~Combine sugar, oil, and eggs. Cream together. Then add the dry ingredients to your creamed mixture, stirring it all together. Lastly, add the molasses and stir all together. If you don't stir thoroughly it will leave your cookies looking marbled. So, if you want them a solid brownish color, stir the molasses in well.

~Roll into whatever size balls you want and place on a parchment covered cookie sheet.

~Bake in a 350 degree oven for 10-12 minutes.

~Follow the above instructions if you want buttons or polka dots of any kind. Or just wait til the cookies cool and dip half of the cookie into the melted white chocolate and place on parchment paper to cool and harden.

~This makes a big batch of cookies! Yields: Many! : )